Project Setup
In this example, you will see how to create forms in Angular using a Reactive and Template driven approach.
In our demonstration, we will create two forms one using the Reactive approach and the other with a template-driven approach.
Create project and add components that we would need.
ng new angularForm
ng g c modelDrivenForm
ng g c templateDrivenForm
Reactive Form
Reactive forms or Model-driven forms provide a model-driven approach for handling form inputs whose values keep changing over time.
Let’s create a complex form that takes in user details like its name as Key, address as Object, and languages as Array.
 {
    "firstName": "",
    "lastName": "",
    "address": {
      "landMark": "",
      "state": "",
      "city": "",
      "pincode": ""
     },
    "langKnown": [""]
  }
Firstly import reactive forms module from @angular/forms in app.model.ts. It would export all infrastructure and directives required for handling reactive forms.
import { ReactiveFormsModule } from '@angular/forms';There are three fundamental building blocks of Angular Forms i.e FormGroup, FormControl, and FormArray. Let’s go over it with examples for better understanding.
FormGroup is used to aggregate values of child FormControl into one object, with each control name as the key of the formGroup object.
Using formGroup also gives an advantage while validating a form, if any key is not valid in the form then it makes the entire form as invalid.
userDetails = this.fb.group({ firstName : [''] })FormControl is used to track values and validate the form object keys individually which is done by binding formControlName.
<form [formGroup]="user" (ngSubmit)="onSubmit()">
    <input type="text" formControlName="firstName" />
</form>
FormArray is used to aggregate values of each FormControl child into an array.
user = this.fb.group({ langKnown: this.fb.array([this.fb.control('')]) })<form [formGroup]="user" (ngSubmit)="onSubmit()">
<div formArrayName="langKnown">
<div *ngFor="let lang of langKnown.controls; let i=index">
<input type="text" [formControlName]="i" />
</div>
</div>
</form>The objective of the form is to capture below details
{
    "firstName": "",
    "lastName": "",
    "address": {
      "landMark": "",
      "state": "",
      "city": "",
      "pincode": ""
     },
    "langKnown": [""]
  }
Below is complete example of Reactive Form it implements all the topics that we covered in above section.
import { Component, OnInit } from '@angular/core';
import { FormBuilder, Validators, FormArray } from '@angular/forms';
@Component({
selector: 'app-model-driven',
templateUrl: './model-driven.component.html',
styleUrls: ['./model-driven.component.css']
})
export class ModelDrivenComponent implements OnInit {
constructor(private formBuilder: FormBuilder) { }
ngOnInit(): void { }
userDetails = this.formBuilder.group({
firstName: ['', Validators.required],
lastName: [''],
address: this.formBuilder.group({
landMark: [''],
state: [''],
city: [''],
pincode: ['']
}),
languagesKnown: this.formBuilder.array([
this.formBuilder.control('')
])
});
get languagesKnown() {
return this.userDetails.get('languagesKnown') as FormArray;
}
updateValues() {
this.userDetails.patchValue({
firstName: 'Rohit',
address: {
landMark: 'Near my house'
}
})
}
addLang() {
this.languagesKnown.push(this.formBuilder.control(''));
}
onSubmit() {
console.log(this.userDetails.value);
}
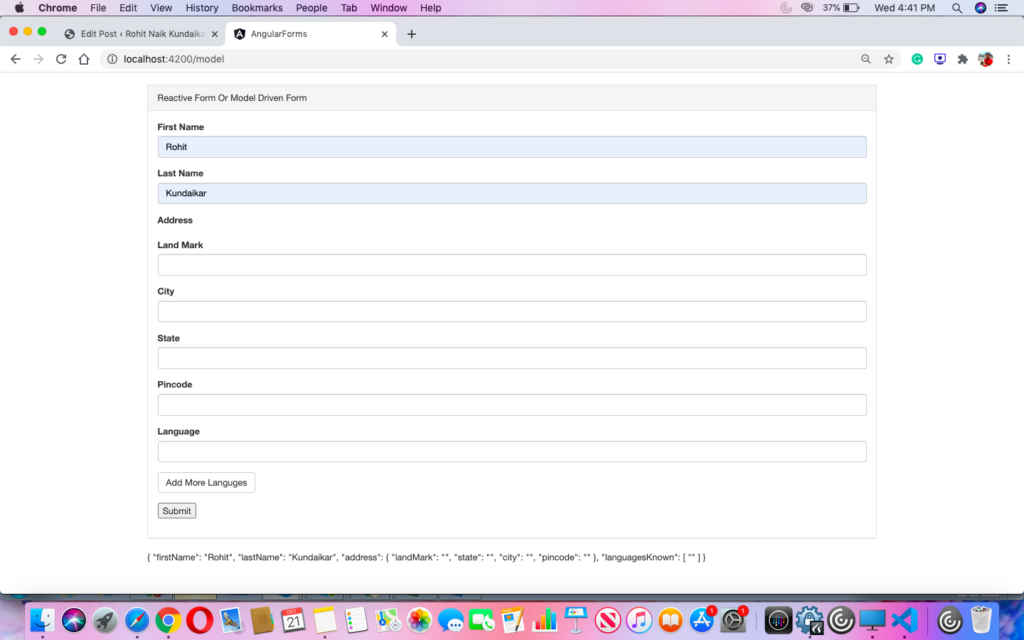
}<div class="container">
<br>
<form [formGroup]="userDetails" (ngSubmit)="onSubmit()">
<div class="well">
<div class="form-group">
<label for="firstName"> First Name </label>
<input id="firstName" type="text" class="form-control" formControlName="firstName" />
</div>
<div class="form-group">
<label for="firstName"> Last Name </label>
<input id="firstName" type="text" class="form-control" formControlName="lastName" />
</div>
<div class="form-group" formGroupName="address">
<label> Address</label>
</div>
<div class="form-group" formGroupName="address">
<label> Land Mark</label>
<input type="text" class="form-control" formControlName="landMark" />
</div>
<div class="form-group" formGroupName="address">
<label> City</label>
<input type="text" class="form-control" formControlName="city" />
</div>
<div class="form-group" formGroupName="address">
<label> State</label>
<input type="text" class="form-control" formControlName="state" />
</div>
<div class="form-group" formGroupName="address">
<label> Pincode</label>
<input type="text" class="form-control" formControlName="pincode" />
</div>
<div formArrayName="languagesKnown">
<div class="form-group" *ngFor="let lang of languagesKnown.controls; let i=index">
<label> Language</label>
<input type="text" class="form-control" [formControlName]="i" />
</div>
<div class="form-group">
<button (click)="addLang()" class="btn btn-default">Add More Languges</button>
</div>
</div>
<div class="form-group" formGroupName="address">
<button type="submit">Submit</button>
</div>
</div>
</form>
{{userDetails.value | json}}
</div>Template Driven Form
Template-driven forms use two-way data binding to update data in the model and in the template. It is quite simple compared to the model-driven approach.
Let’s create a simple form that captures userName, password, and userTypeas shown below.
{ "userName": "", "password": "", "userType": "" }Create a Login entity class with all the key that it accepts as shown below.
export class Login {
    constructor(
        public userName : string,
        public password : string,
        public userType : string
    ){}
}
Then create an object of this class in the model and assign default values if any.
model = new User("","","admin");Below is a brief explanation of directives and events used in the template form.
ngForm : The ngForm directive creates a top-level FormGroup instance and binds it to a <form> element to track aggregated form value and validation status
ngSubmit: The ngSubmit event handles form submission
<form #login="ngForm" (ngSubmit)="onSubmit()">[(ngModel)] : The [(ngModel)] is used to create two-way data binding for reading and writing input-control values.
When using [(ngModel)] on an element, you need to define a name attribute for that element.
Its a mandate since angular uses the assigned name to register the element with the NgForm directive attached to the parent <form> element.
Below is complete example of template driven approach that discussed above.
<div class="container">
    <br>
    <div class="panel panel-default">
        <div class="panel-heading">Template Driven Form</div>
        <div class="panel-body">
            <form #login="ngForm" (ngSubmit)="onSubmit()">
                <div class="form-group">
                    <label for="firstName"> User Name </label>
                    <input type="text" class="form-control"
                    [(ngModel)]="model.userName"
                    name="userName"
                    id="userName"
                    #userName="ngModel" />
                </div>
                <div class="form-group">
                    <label for="password"> Password </label>
                    <input type="password" class="form-control"
                    [(ngModel)]="model.password"
                    name="password"
                    id="password"
                    #password="ngModel" />
                </div>
                <div class="form-group">
                    <label for="userType"> User Type </label>
                    <select class="form-control" id="userType" required
                        [(ngModel)]="model.userType"
                        name="userType"
                        #userType="ngModel">
                        <option value="admin">Admin</option>
                        <option value="user">User</option>
                    </select>
                </div>
                <div class="form-group">
                    <button type="submit"> Submit </button>
                </div>
            </form>
        </div>
    </div>
    {{model | json}}
</div>
Complete source code for Angular Forms example: https://github.com/thatsrohitnaik/Angular-Forms
Happy coding !!
